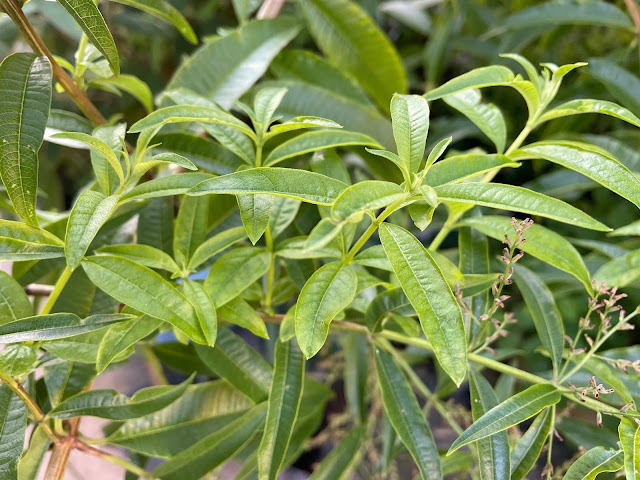
Kamis, 31 Maret 2022

Lemon Verbena In All Its Deliciousness

 KITCHEN GARDEN  

LEMON VERBENA

Did you think that herbs were just for making tea?

Maybe not, but some herbs have endless uses, and this week I’m featuring the herb lemon verbena (Aloysia citriodora) that’s larger than you would expect to find in a herb garden so probably could fit into the back of a border but in a sunny location.
Lemon verbena photo M Cannon
  • How would I describe the scent of lemon verbena?
I would say that lemon verbena has a bright, slightly sweet flavour with a strong hint of lemon.
The strong lemon scent of this herb is far less overpowering than the lemon flavor and fragrance of lemon balm, lemon thyme, lemon mint, and lemongrass.

What does it look like?

Lemon verbena is a vigorous growing deciduous shrub to 3 metres tall by 3 metres wide. 
The leaves are a lime green and lanceolate, and flowers appear in late spring until the end of summer almost. 
The flowers are white, quite small and appear in a panicle.
  • My plant is quite an old plant that I prune each winter to about 1 metre off the ground.

How to use lemon verbena?

  • As a flavouring in kombucha
  • Add leaves to a sorbet or ice-cream when making
  • Poach stone fruit in a sugar syrup with lemon verbena leaves
  • Infuse lemon verbena leaves in olive oil or vinegar-250 ml of olive oil with 6 leaves or to taste
  • Fish en papiotte with lemon verbena leaves

Corinne's Top Tip: 

Why not try  a gin and sonic with muddled lemon verbena. Made with half soda water and half tonic so less calories. 

Listen to the podcast.
Marianne is talking  Corinne Mossati, founder of   http://www.thegourmanticgarden.com
You can also follow Corinne for more delightful ideas on Instagram or subscribe to updates  http://www.thegourmanticgarden.com/subscribe/


Mixed Spice and All Things Nice

 SPICE IT UP

MIXED SPICE

The name 'mixed spice,' sounds 'oldie worldie' to me because it's not something that comes up in too many recipes these days. 
Perhaps if your flicking through an old  Woman's Weekly recipe book, or the cookbook you used at school in home economics class, you might find it in the cakes and buns section.

What is mixed spice?

Mixed Spice is a sweet spice blend and is used in a variety of cakes, puddings, pies, breads and buns, biscuits, pancakes, cupcakes, gingerbreads, and even fruit salads.

Mixed spice has actually the following ground spices.

  • Cinnamon-two types, Sri Lankan cinnamon and cassia cinnamon
  • Nutmeg
  • Ginger-to add brightness and freshness
  • Cloves-a very small amount.
  • Allspice-a spice all on its own which is actually a berry.
  • Coriander seeds, ground of course. Coriander is an amalgamating spice.

But what do you use if you can find it on the supermarket shelves?
Melting Moment biscuits

Mixed spice quick alternative:
  • Cinnamon 1 tablespoon
  • Nutmeg     1 teaspoon
  • Ginger       1 teaspoon
  • Cloves       1/2 cloves
  • Coriander  2 teaspoons


Marianne is talking with Ian Hemphill from www.herbies.com.au

With the predominant flavor of cinnamon, it also makes a nice change to substitute this spice blend for anything calling for cinnamon for an added flavour boost.

If you have any questions you can email us Realworldgardener@gmail.com or write in to 2rrr, PO Box 644 Gladesville NSW 1675.

Kamis, 24 Maret 2022

Building an electric guitar DIY kit and decorating it with pyrography


Tools and materials:

Pyrography Pen Wood Burning Kit

Alcohol based markers

Buffing Wheel Set

Cleaning & polishing rotary tool kit

Chisel set

Bandsaw

Cordless drill

Rotary tool

Belt sander

Flat rasp

Round rasp

Flat file

Round file

Spoke shave


In this video I put together a Harley Benton jazz master type guitar kit. I also decorated the body with pyrography. This was definitely worth it and I really enjoyed the process.


The kit had everything in it. It even included guitar strings and cable for the amp. 


First of all I scanned the headstock and created my design. I then cut the headstock on the bandsaw and sanded it nicely. 


I then added the name of the guitar. I added a coat of sealer and then colored the pyrography. I buffed the piece with carnauba wax. 


Then I polished the frets. I like the frets polished because bending and vibrato feels much nicer. 


Then I created my artwork with the burner. I added the sealer and then the color. Finally I buffed the body with carnauba wax once again. 


Then I assembled all the parts. I had to set up the pick ups to the proper height so they sound OK. I still have to fine tune the intonation a little bit. 


But that was it. It was really easy to do it. Definitely worth the money. It was really fun. See you soon with a new project video. 


Disclosure: Some of the links below are affiliate links, meaning, that at no cost to you, I get a small commission if you click through and make a purchase.

Sabtu, 19 Maret 2022

Macro Nutrient Deficiencies: Symptoms and Fixes

 PLANT HEALTH

Plant Nutrition Deficiencies: Macro Nutrient Nitrogen

The 'Plant health' segment was created for my radio show "Real World Gardener,' as a division of the 'Plant doctor' segment, because I felt that it’s important to focus on what can go wrong with plants that isn’t a pest or a disease.
In the following audio podcasts, you will hear about what to look for in plants that have deficiencies of one of the macro nutrients: Nitrogen:Phosphorus:Potassium; in other words NPK or the macro nutrients.


Gardeners can often see problems appearing first in the colour of the leaves, but this can also be followed closely by lack of vigour, stunted growth and general unthriftiness of the plant.

The key to diagnosing problems, however isn't just looking at the colour of the leaves but it's knowing your soil type and soil pH.
Yes, I know, we do go on about soil pH but that often underlies the reason behind your plants' problems.
The other underlying problem may be insufficient drainage which causes waterlogging of the soil.

That said, we  will assume that you soil pH is around 6.5 - 7 but your still seeing issues that are showing up in the leaves. So what next?

Macro Nutrient Nitrogen

Nitrogen is one of the three big nutrients or macro nutrients that plants need.

Nitrogen is responsible for leaf growth and blossom formation.

First Symptoms: Oldest leaves start to appear pale first, yellowing at the leaf tips then eventually the whole leaf will turn yellow.
Quick Fix: Soluble fertiliser high in nitrogen. 
Results should appear in a few days.
Long term fix: Blood  n' Bone and/or controlled release fertilisers.

Nitrogen on it’s own can be useful for quick greening of lawns and leafy plants like ferns in pots when the potting mix is depleted of any nutrients.
Listen to the podcast: I'm talking with Kylie Last horticulturist and tafe teacher.


Plant Nutrition Deficiencies:Phosporus and Potassium

We have talked bout the role nitrogen played in played health and what to look for if a plant was deficient in one of the major nutrients, being Nitrogen.
  • In fact there are three major nutrients which are classified as NPK ratio on the back of all fertilisers. So in this part of the blog, we carry on with the two other major or macro nutrients.

Let's look at phosphorus deficiency

Phosphorus is responsible for the development of flowers and fruits and roots.
  • Phosporus is known as a mobile nutrient which can move around the plant to where it's needed.
  • Phosphorus deficiency happens more often in cold weather or gardens receive high rainfall, or a combination of both.
  • Often affects heavily fruiting plants such as citrus.
  • N..B. native plants are highly sensitive to phosphorus, so avoid spreading phosphate fertilisers near these plants.

First Symptoms: Older leaves become quite a dark green then develop a purplish tinge.
 
Tips will then dry off. Not to be confused with lack of watering especially in pot plants where leaves can also develop dry tips.
Overall growth is affected in the long term resulting in smaller leaves and stunted growth.

Quick Fix: Fertiliser high in phosphate either solid or liquid.
Long term fix: Blood  n' Bone and/or controlled release fertilisers. 

Let's look at potassium deficiency

Potassium is responsible for thickening of cell walls, and also responsible for plant growth. Potassium deficiency are more evident in flowering or ornamental plants. Potassium deficiency often is a pH issue in the soil.

First Symptoms: Older leaves become brown and dry on the upper surface, with leaf edges puckering slightly. 
As the deficiency progresses, the leaves darken in colour between the veins.
Flower stalks become thin and spindly and may be quite short.
Fruits may fail to develop full colour and flavour.

Quick Fix: Fertiliser high in potassium either solid or liquid, such as sulphate of potash.
Long term fix: Blood  n' Bone and/or controlled release fertilisers. 

Listen to the podcast: I'm talking with Kylie Last horticulturist and tafe teacher.


I would recommend becoming familiar with the NPK ration on fertilisers, whether organic or not to see if you’re applying the right sort for your plants.

For example, fertilisers that promote flowering and fruiting have higher ratios of potassium than those that are just for general purpose fertilising.
If you have any questions you can email us Realworldgardener@gmail.com or write in to 2rrr, PO Box 644 Gladesville NSW 1675.

Jumat, 18 Maret 2022

How to make a DIY dinosaur lamp with LED strip


Tools and materials I propose:

Circular saw

Circular saw guide rail

Belt sander

Lathe

Wood turning tools set

Chuck kit

Cordless drill

Forstner bit set

Led Strip RGB Light

Bandsaw

Chisel set

Router

Router bits

Hot glue gun

Airbrush kit

Jigsaw


In this video I make a dinosaur shaped LED lamp out of plywood.


I begun by designing a vector template of my dinosaur. I then printed it on actual size and glued it on a piece of plywood with spray adhesive. 


I cut my plywood to more manageable pieces with my circular saw. I then cut around my template on the bandsaw. I couldn’t reach a few spots on my small bandsaw so I used the jigsaw to finish the job. 


I then sanded the piece on the belt sander. I don’t have a spindle sander so I made an arrangement to use the lathe as a spindle sander. 


I then cut another piece on the bandsaw. This acts as spacer and also provides the space for the LED Strip.


I then glued and nailed the back piece in place. 


I drilled the hole for the eyeball with a forstner bit and turned the eye on the lathe. 


Using the router I added a roundover on my edges. 


I added a coat of sanding sealer and then used my airbrush to spray paint the piece. I used latex paints. I thinned them really well with water so the airbrush could spray them. 


I protected the paint job with clear water based varnish. 


I then hot glued my LED strip in place. 


And that was it. My little dino lamp was ready. I hope you liked this project, because that was it. See you soon with a new project video. 


Disclosure: Some of the links below are affiliate links, meaning, that at no cost to you, I get a small commission if you click through and make a purchase.

Jumat, 11 Maret 2022

Making a simple DIY router jig for the lathe


Tools and materials I propose:

Trim router

Hole saw

Table saw

Air compressor, nail and staple gun kit

Random orbit sander

Cordless drill

Cordless Impact Driver

Bandsaw

Forstner bit set

Lathe

Wood turning tools set

Chuck kit


In this video I make a router jig for woodturning projects. This jig helps you use the trim router while your project is still mounted on the lathe. It works really nicely if you also use a divider in woodturning. 


I begun by cutting some scrap wood to size on the table saw. 


I then used a hole saw to open up the holes for my trim router. 


I sanded the holes to achieve a snug fit. 


Next I glued and nailed all the pieces together. 


I then made the jig’s rest for my lathe. I turned a dowel and glued it on a flat base. 


It is important for the jig to can be aligned with the lathe’s centre. 


After that it was ready to test it. 


It worked really nicely. Especially along with a divider. 


But that was it. See you soon with  a new project video. 


Disclosure: Some of the links below are affiliate links, meaning, that at no cost to you, I get a small commission if you click through and make a purchase.

Jumat, 04 Maret 2022

Converting an unplayable toy to a playable acoustic mini guitar


Tools and materials:

Bandsaw

Cordless drill

Belt sander

Small files set

Airbrush kit


This project begun by a toy guitar. It had some potential but it couldn't actually play. So I tried to make a few fine tunings on the instrument and now it's actually playable.


First of all I checked if the 12th fret was in the middle of the distance from nut to nut. It was a little off. So I removed the nut and bridge. 


I then cut the headstock a little bit because I wanted to make it a 4 string instrument. 


Since I removed the bridge I had to repaint the top. I used my airbrush with latex paints and water based varnish. 


Next I re-positioned the bridge and epoxied it in place. 


Now the fret was OK but I had really high action which led to intonation problems. So to lower the action I lowered the height of both nuts. 


And my little guitar was ready. Still it isn’t the most easy and accurate instrument but at least it is playable. I hope you liked this project, because that was it, see you soon with a new project video. 


Disclosure: Some of the links below are affiliate links, meaning, that at no cost to you, I get a small commission if you click through and make a purchase.


Kamis, 03 Maret 2022

Lacto Fermentation: Quick 'n Easy Guide

 KITCHEN GARDEN

LACTO-FERMENTATION

There are several ways to preserve food, these include freezing, drying, pickling and fermenting.
You may think that fermented foods are a recent trend, but in fact, fermenting food has been carried out for thousands of years.
Fermenting food is one way of preserving your ample supply of produce that's growing in your garden.
There are a few ways to ferment foods but lacto-fermentation is one of the easiest.
  • The term lacto-fermentation is a scary one and belies how simple it really is. It's unbelievably quick and easy.
    Lacto fermented radish

So what is it?

Firstly the term wasn't derived for having to use milk in the process.
Lacto refers to the lactobacillus bacteria that does all the breaking down of the food.
Did you know that all vegetables are covered in the various strains of the good bacteria lactobacillus?
It does involve lactic acid in the process which is a good thing because lactic acid is a natural preservative.
  • What about the bad bacteria?
No problem, the brine that you submerge your vegetables in kill them off, while the lactobacillus survives to do the preserving work.
Using the correct salt to water ratio in your brine will ensure the safety of your lacto-fermentation.

How do you do it?

You can lacto-ferment most produce in yur garden.
 Beans, carrots, beetroot, and Corinne's favourite is using stalks of chard, nasturtium seeds.
You need salt but not iodised or table salt. Table salt will make the ferment go bad because of it's additives.
  • Use high quality sea-salt.
  • Photo: Corinne Mossati of Gourmantic Garden
    Non-chlorinated water, and no fluoride so will need to be filtered water.
  • Kilner jar or a glass jar with a lid.
  • Weights to submerge your ferment.
  • BASIC RULE: Brine solution is 2-3% salt.  
  • 2% brine:1 litre of water needs 20 grams of salt: 
Step by Step
  1. Collect your dry ingredients and add them to a dry sterile fermentation jar.
  2. Pour in the brine solution to cover the vegetables.
  3. Add a ceramic weight on top to keep the vegetables below the liquid.
  4. Burp the jar daily: this releases the gas.
  5. It will take 2-3 weeks during the summer months.
  6. Once it's ready, place it in the fridge to slow the ferment process.

Are you a chilli aficionado?

Perhaps you’re growing the world’s hottest chilli, Carolina Reaper or the second hottest, Ghost chilli?
But did you know that Carolina Reaper chilli is 200x hotter than a Jalapeno pepper?
But what do you do with all those chillies other than freeze them?
  • Why not make a chilli lacto-fermeneted sauce?
Follow the above steps then once you think the chillies are done, drain the brine and add other flavouring ingredients.
Blitz in a food processor.

To find out more, listen to the podcast.

I'm talking with Corinne Mossati, founder of the http://www.thegourmanticgarden.com website.

If you have any questions you can email us Realworldgardener@gmail.com or write in to 2rrr, PO Box 644 Gladesville NSW 1675.